TI WooCommerce Wishlist
Product Analytics
Our plugin comes with powerful analytics tool, that helps you not only understand what products are most “wished” but also see sales statistics from customers wishlists. You’ll be able to see such important data as CTR and abandonment rate. For example, you’ll be able to see products that people wish but maybe can’t afford, so you can build your sales strategy and send them promotions.
1. Popular Products Stats
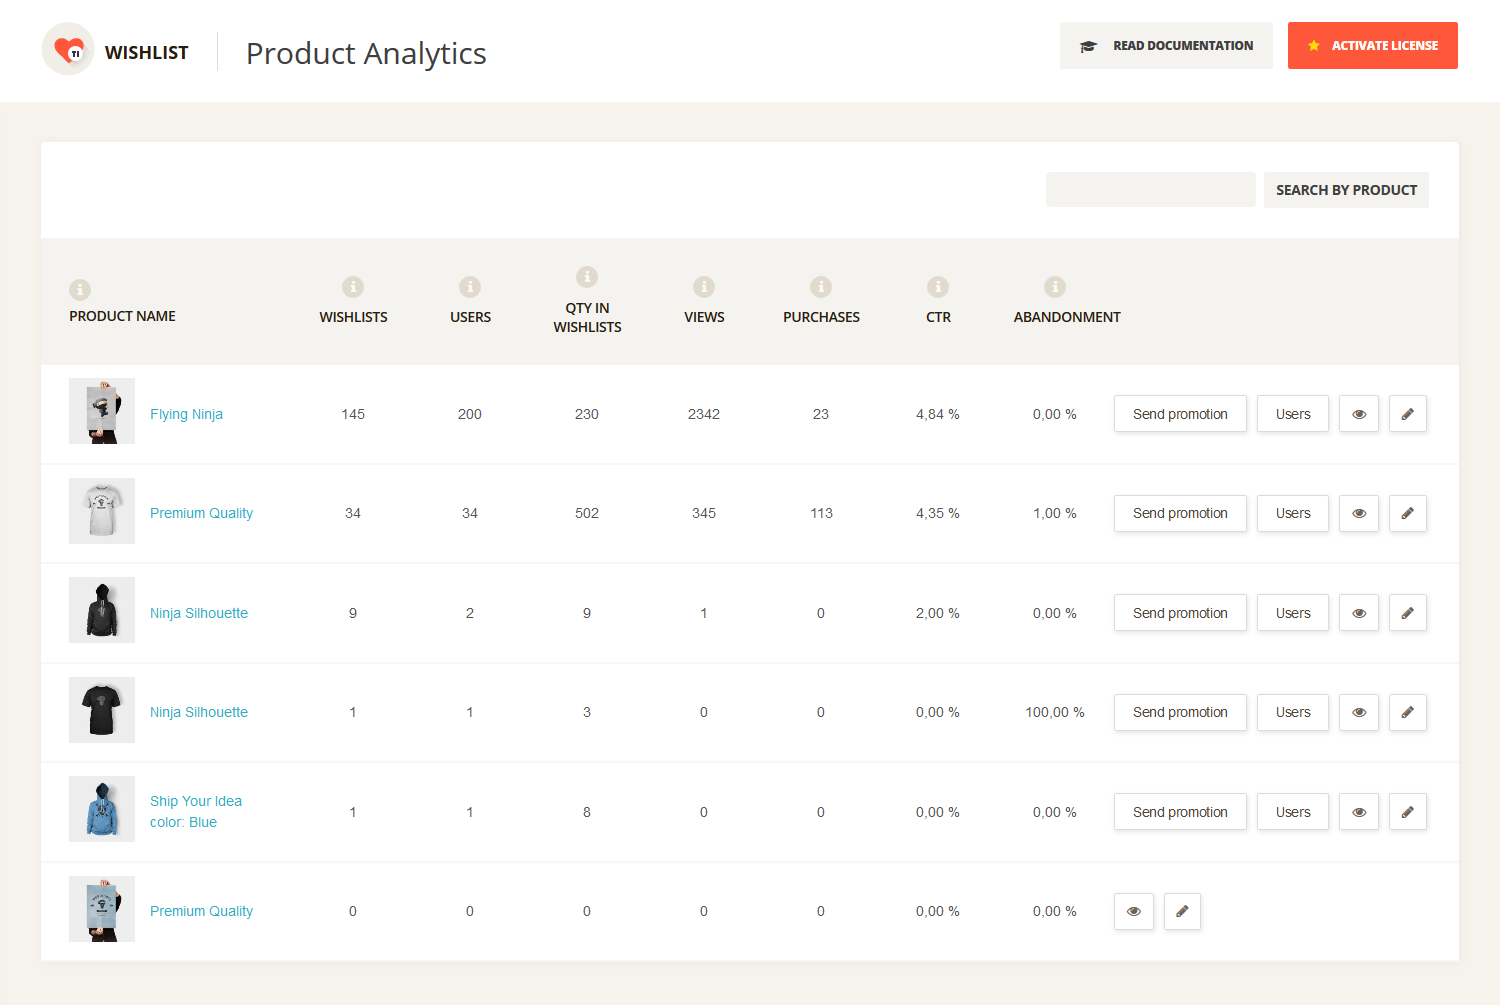
In Popular Products section you can see various stats for products that are added to wishlist. You can find explanation for each stat below.
Product Name – a list of products which customers added to wishlist.
Wishlists – amount of wishlists where this product has been added. Note, that users can create multiple wishlists, if allowed, and add the same product to different wishlists. That is why we have added next stat.
Users – shows the number of unique users that have added this product into wishlists. So this stat can give you the most correct understanding of the product popularity.
QTY in Wishlists – shows total quantity of a product in all wishlists. We have added option to add more than one product to wishlist (you can disable it) because some product may be sold in bulk. And this option can help to predict the required amount of items in stock.
Views – this stat shows you how many times people navigated to the specific product page from wishlist (viewed this product). So it counts the clicks that were made from the wishlist page.
Purchases – shows the number of completed purchases that where initiated from wishlist page.
CTR – Click Trought Rate. The ratio of clicks on a product to views of the wishlist where this product is listed (product clicks/product views)*100. This stat helps you understand how many times people navigated to the product page from wishlist. This is useful for shared and public wishlists.
Abandonment – Abandonment rate as a marketing metric helps marketers to understand website user behavior. The abandonment rate is the ratio the number of abandoned shopping carts to the number of initiated transactions from Wishlist. (Add to Cart from Wishlist – Complete Purchases)/Add to Cart from Wishlist.
Although shoppers in brick and mortar stores rarely abandon their carts, abandonment of virtual shopping carts is quite common. Marketers can count how many of the shopping carts used in a specified period result in completed sales versus how many are abandoned. The typical shopping cart abandonment rate for online retailers varies between 60% and 80%, with an average of 67.91%.
There are various reasons behind the high cart abandonment rate.
- Complicated checkout process.
- Hidden prices that come out at the time of checkout like taxes or high shipping charge.
- Tough or lengthy registration process. No option to check out without signing up.
- Limited payment options.
Need more stats? Make a request and we’ll add them!
Actions:
Send Promotional – allows you to send promotional e-mail to all users that have specific product in their wishlists. After clicking this button you’ll be redirected to a page, where you can adjust the text of your e-mail. If you need to make more changes to your promotional e-mail, like changing colors or template then you can do this under the TI Wishlist -> Email Settings section. See big popularity and CTR but low sales and big abandomnet rate? Try to send promotional emails with discounts and special offers to all users that added product to wishlist.
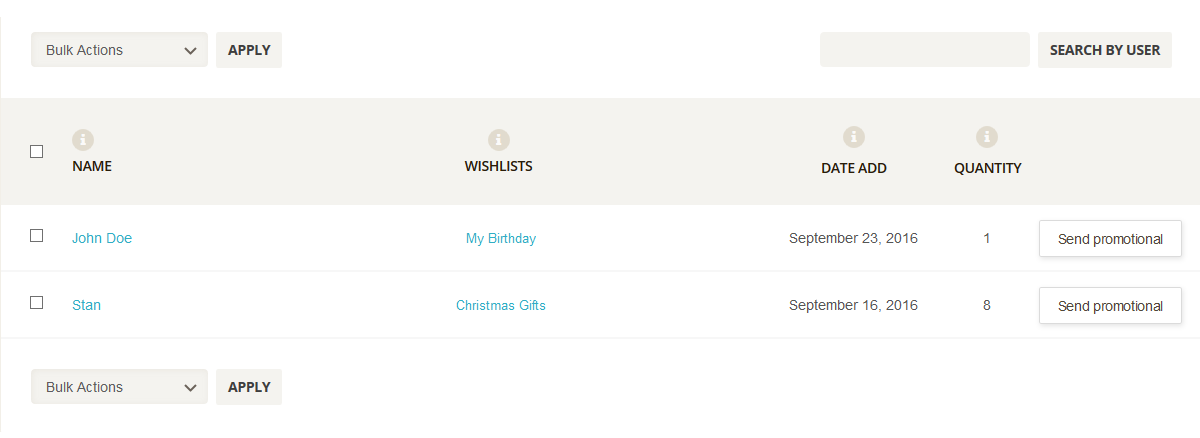
Users – the list of the users that have specific product in their Wishlists (See a screenshot below). This option allows you to view all users and their account and for example send them personal promotional emails.
View (eye icon) – the link to a product page on frontend.
Edit (pen icon) – the link to “Edit Product” page in the admin panel.
2. Send Promotional
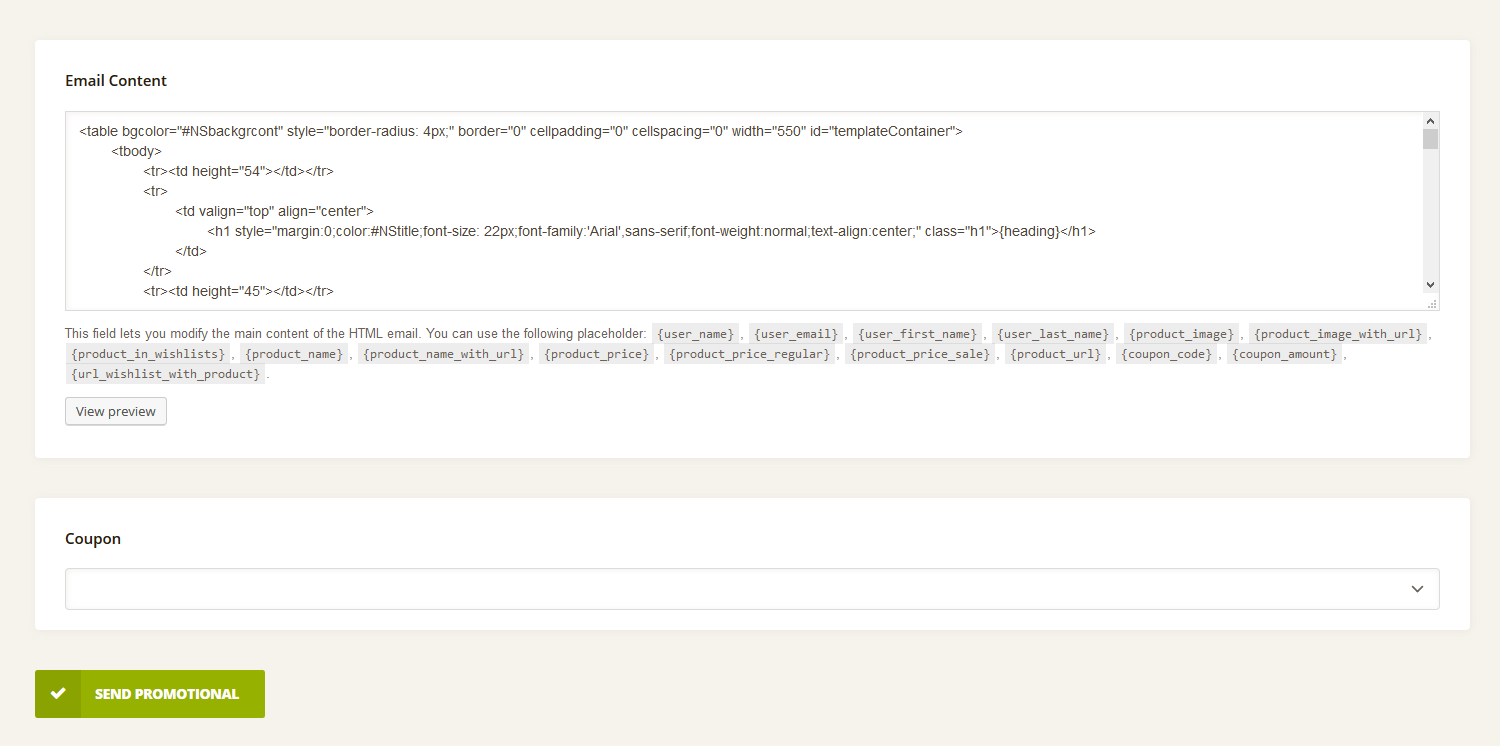
Before sending a promo you can edit its content part that is managed in a TI Wishlist -> Email Settings section by default and also preview the changes.
Email Content – in this area you can manage the promotional email template: edit styles and structure, add/remove placeholders etc.
After you finish customizing the email template click the “View preview” button to check the results.
* Placeholders Clarification:
{user_name} – the name used by a customer for login.
{user_first_name} – customer’s first name.
{user_last_name} – customerr’s last name.
{user_email} – customer’s email address.
{product_name} – a product title.
{product_name_with_url} – a clickable product title with a link to a product page.
{product_image} – the featured image applied for a product.
{product_image_with_url} – a clickable product image with a link to a product page.
{product_url} – a link to a product page. (http://www.website.com/product)
{product_price} – the actual product price. ( 120$ or 140$ 120$ )
{product_price_regular} – regular price applied for a product.
{product_price_sale} – sale price applied for a product.
{coupon_code} – code used by the customer to apply the coupon.
{coupon_amount} – fixed value or percentage off depending on the discount type you choose. (’10’ for 10$ or 10%)
The info on how to add coupons, you can find in WooCommerce official documentation: Coupon Management.
{product_in_Wishlists} – a list of Wishlists where this product has been added.
{url_Wishlist_with_product} – a link to a Wishlist where the product has been added.
Our plugin comes with 3 predefined templates that you can choose under the TI Wishlist -> E-mail Templates section.