
Introduction
TI WooCommerce Wishlist 1.13.0+ and WooCommerce (WC) 2.6+ has been fully integrated with the WordPress REST API. This allows WC and Wishlists data to be created, read, updated, and deleted using requests in JSON format and using WordPress REST API Authentication methods and standard HTTP verbs which are understood by most HTTP clients.
The current WP REST API integration version is v3 which takes a first-order position in endpoints.
Requirements
To use the latest version of the REST API you must be using:
- WooCommerce 3.5+.
- WordPress 4.4+.
- Pretty permalinks in
Settings > Permalinksso that the custom endpoints are supported. Default permalinks will not work. - You may access the API over either HTTP or HTTPS, but HTTPS is recommended where possible.
If you use ModSecurity and see 501 Method Not Implemented errors, see this issue for details.
Request/Response Format
The default response format is JSON. Requests with a message-body use plain JSON to set or update resource attributes. Successful requests will return a 200 OK HTTP status.
Some general information about responses:
- Dates are returned in ISO8601 format:
YYYY-MM-DDTHH:MM:SS - Resource IDs are returned as integers.
- Any decimal monetary amount, such as prices or totals, will be returned as strings with two decimal places.
- Other amounts, such as item counts, are returned as integers.
- Blank fields are generally included as
nullor emtpy string instead of being omitted.
JSONP Support
The WP REST API supports JSONP by default. JSONP responses use the application/javascript content-type. You can specify the callback using the ?_jsonp parameter for GET requests to have the response wrapped in a JSON function:
/wp-json/wc/v3?_jsonp=callback
curl https://example.com/wp-json/wc/v3/products/tags/34?_jsonp=tagDetails \
    -u consumer_key:consumer_secret
WooCommerce.get('products/tags/34?_jsonp=tagDetails', function(err, data, res) {
  console.log(res);
});
<?php print_r($woocommerce->get('products/tags/34', ['_jsonp' => 'tagDetails'])); ?>
print(wcapi.get("products/tags/34?_jsonp=tagDetails").json())
woocommerce.get("products/tags/34", _jsonp: "tagDetails").parsed_response
Response:
/**/tagDetails({"id":34,"name":"Leather Shoes","slug":"leather-shoes","description":"","count":0,"_links":{"self":[{"href":"https://example.com/wp-json/wc/v3/products/tags/34"}],"collection":[{"href":"https://example.com/wp-json/wc/v3/products/tags"}]}})%
Errors
Occasionally you might encounter errors when accessing the REST API. There are four possible types:
| Error Code | Error Type |
|---|---|
400 Bad Request |
Invalid request, e.g. using an unsupported HTTP method |
401 Unauthorized |
Authentication or permission error, e.g. incorrect API keys |
404 Not Found |
Requests to resources that don't exist or are missing |
500 Internal Server Error |
Server error |
WP REST API error example:
{
  "code": "rest_no_route",
  "message": "No route was found matching the URL and request method",
  "data": {
    "status": 404
  }
}
WooCommerce REST API error example:
{
  "code": "woocommerce_rest_term_invalid",
  "message": "Resource doesn't exist.",
  "data": {
    "status": 404
  }
}
Errors return both an appropriate HTTP status code and response object which contains a code, message and data attribute.
Parameters
Almost all endpoints accept optional parameters which can be passed as a HTTP query string parameter, e.g. GET /orders?status=completed. All parameters are documented along each endpoint.
Pagination
Requests that return multiple items will be paginated to 10 items by default. This default can be changed by the site administrator by changing the posts_per_page option. Alternatively the items per page can be specified with the ?per_page parameter:
GET /orders?per_page=15
You can specify further pages with the ?page parameter:
GET /orders?page=2
You may also specify the offset from the first resource using the ?offset parameter:
GET /orders?offset=5
Page number is 1-based and omitting the ?page parameter will return the first page.
The total number of resources and pages are always included in the X-WP-Total and X-WP-TotalPages HTTP headers.
Link Header
Pagination info is included in the Link Header. It's recommended that you follow these values instead of building your own URLs where possible.
Link: <https://www.example.com/wp-json/wc/v3/products?page=2>; rel="next",
<https://www.example.com/wp-json/wc/v3/products?page=3>; rel="last"`
The possible rel values are:
| Value | Description |
|---|---|
next |
Shows the URL of the immediate next page of results. |
last |
Shows the URL of the last page of results. |
first |
Shows the URL of the first page of results. |
prev |
Shows the URL of the immediate previous page of results. |
Libraries and Tools
Official libraries
// Install:
// npm install --save woocommerce-api

// Setup:
var WooCommerceAPI = require('woocommerce-api');

var WooCommerce = new WooCommerceAPI({
  url: 'http://example.com', // Your store URL
  consumerKey: 'consumer_key', // Your consumer key
  consumerSecret: 'consumer_secret', // Your consumer secret
  wpAPI: true, // Enable the WP REST API integration
  version: 'wc/v3' // WooCommerce WP REST API version
});
<?php
// Install:
// composer require automattic/woocommerce

// Setup:
require __DIR__ . '/vendor/autoload.php';

use Automattic\WooCommerce\Client;

$woocommerce = new Client(
    'http://example.com', // Your store URL
    'consumer_key', // Your consumer key
    'consumer_secret', // Your consumer secret
    [
        'wp_api' => true, // Enable the WP REST API integration
        'version' => 'wc/v3' // WooCommerce WP REST API version
    ]
);
?>
# Install:
# pip install woocommerce

# Setup:
from woocommerce import API

wcapi = API(
    url="http://example.com", # Your store URL
    consumer_key="consumer_key", # Your consumer key
    consumer_secret="consumer_secret", # Your consumer secret
    wp_api=True, # Enable the WP REST API integration
    version="wc/v3" # WooCommerce WP REST API version
)
# Install:
# gem install woocommerce_api

# Setup:
require "woocommerce_api"

woocommerce = WooCommerce::API.new(
  "https://example.com", # Your store URL
  "consumer_key", # Your consumer key
  "consumer_secret", # Your consumer secret
  {
    wp_api: true, # Enable the WP REST API integration
    version: "wc/v3" # WooCommerce WP REST API version
  }
)
Third party libraries
Tools
Some useful tools you can use to access the API include:
- Postman - A multi platform REST API GUI client (using Google Chrome or installing the app on Mac OS X or Windows).
- CocoaRestClient - A Mac OS X GUI client for interacting with the API.
- Paw HTTP Client - Another HTTP client for Mac OS X.
- RESTClient, a debugger for RESTful web services - Free Firefox add-on.
- Advanced REST client - Free Google Chrome extension.
- RequestBin - Allows you test webhooks.
- Hookbin - Another tool to test webhooks.
Learn more
Learn more about the REST API checking the official WordPress REST API documentation.
Authentication
WooCommerce includes two ways to authenticate with the WP REST API. It is also possible to authenticate using any WP REST API authentication plugin or method.
REST API keys
Pre-generated keys can be used to authenticate use of the REST API endpoints. New keys can be generated either through the WordPress admin interface or they can be auto-generated through an endpoint.
Generating API keys in the WordPress admin interface
To create or manage keys for a specific WordPress user, go to WooCommerce > Settings > API > Keys/Apps.
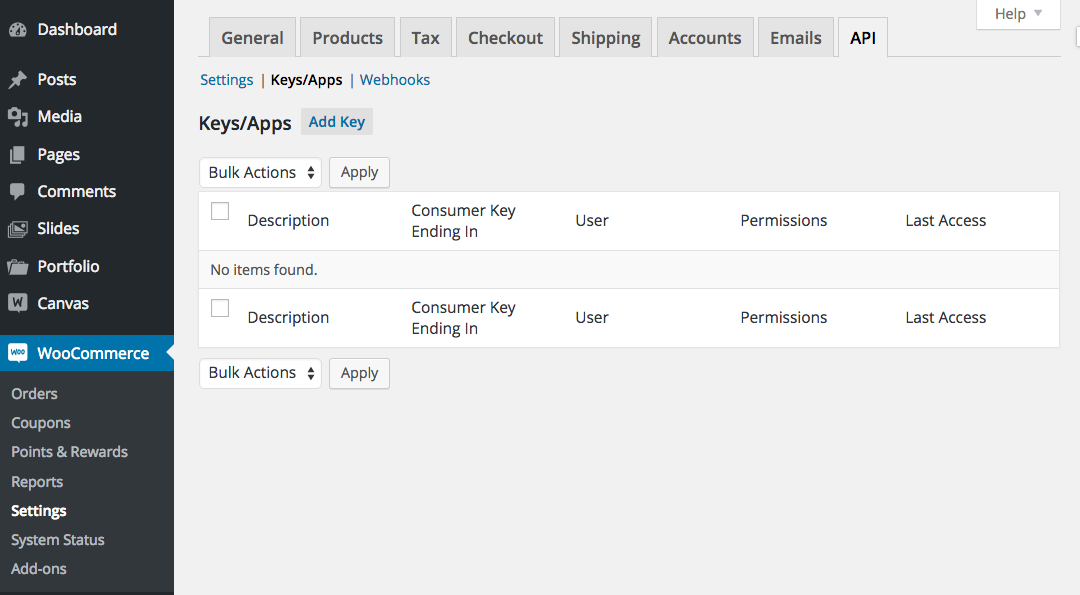
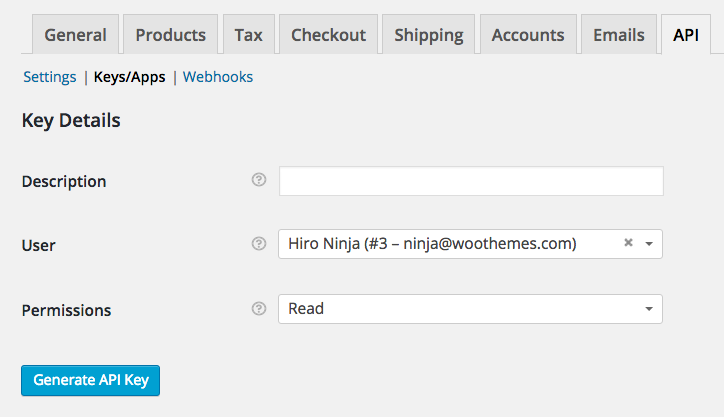
Click the "Add Key" button. In the next screen, add a description and select the WordPress user you would like to generate the key for. Use of the REST API with the generated keys will conform to that user's WordPress roles and capabilities.
Choose the level of access for this REST API key, which can be Read access, Write access or Read/Write access. Then click the "Generate API Key" button and WooCommerce will generate REST API keys for the selected user.
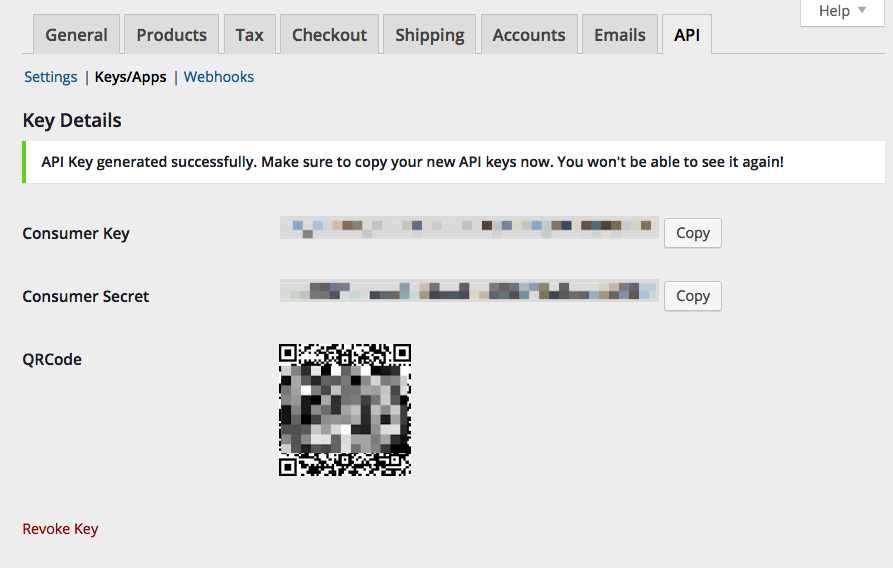
Now that keys have been generated, you should see two new keys, a QRCode, and a Revoke API Key button. These two keys are your Consumer Key and Consumer Secret.
If the WordPress user associated with an API key is deleted, the API key will cease to function. API keys are not transferred to other users.
Auto generating API keys using our Application Authentication Endpoint
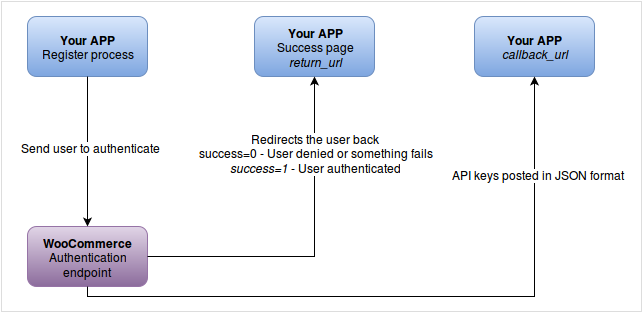
This endpoint can be used by any APP to allow users to generate API keys for your APP. This makes integration with WooCommerce API easier because the user only needs to grant access to your APP via a URL. After being redirected back to your APP, the API keys will be sent back in a separate POST request.
The following image illustrates how this works:
URL parameters
| Parameter | Type | Description |
|---|---|---|
app_name |
string | Your APP name mandatory |
scope |
string | Level of access. Available: read, write and read_write mandatory |
user_id |
string | User ID in your APP. For your internal reference, used when the user is redirected back to your APP. NOT THE USER ID IN WOOCOMMERCE mandatory |
return_url |
string | URL the user will be redirected to after authentication mandatory |
callback_url |
string | URL that will receive the generated API key. Note: this URL should be over HTTPS mandatory |
Creating an authentication endpoint URL
You must use the /wc-auth/v1/authorize endpoint and pass the above parameters as a query string.
Example of how to build an authentication URL:
# Bash example
STORE_URL='http://example.com'
ENDPOINT='/wc-auth/v1/authorize'
PARAMS="app_name=My App Name&scope=read_write&user_id=123&return_url=http://app.com/return-page&callback_url=https://app.com/callback-endpoint"
QUERY_STRING="$(perl -MURI::Escape -e 'print uri_escape($ARGV[0]);' "$PARAMS")"
QUERY_STRING=$(echo $QUERY_STRING | sed -e "s/%20/\+/g" -e "s/%3D/\=/g" -e "s/%26/\&/g")

echo "$STORE_URL$ENDPOINT?$QUERY_STRING"
var querystring = require('querystring');

var store_url = 'http://example.com';
var endpoint = '/wc-auth/v1/authorize';
var params = {
  app_name: 'My App Name',
  scope: 'read_write',
  user_id: 123,
  return_url: 'http://app.com/return-page',
  callback_url: 'https://app.com/callback-endpoint'
};
var query_string = querystring.stringify(params).replace(/%20/g, '+');

console.log(store_url + endpoint + '?' + query_string);
<?php
$store_url = 'http://example.com';
$endpoint = '/wc-auth/v1/authorize';
$params = [
    'app_name' => 'My App Name',
    'scope' => 'write',
    'user_id' => 123,
    'return_url' => 'http://app.com',
    'callback_url' => 'https://app.com'
];
$query_string = http_build_query( $params );

echo $store_url . $endpoint . '?' . $query_string;
?>
from urllib.parse import urlencode

store_url = 'http://example.com'
endpoint = '/wc-auth/v1/authorize'
params = {
    "app_name": "My App Name",
    "scope": "read_write",
    "user_id": 123,
    "return_url": "http://app.com/return-page",
    "callback_url": "https://app.com/callback-endpoint"
}
query_string = urlencode(params)

print("%s%s?%s" % (store_url, endpoint, query_string))
require "uri"

store_url = 'http://example.com'
endpoint = '/wc-auth/v1/authorize'
params = {
  app_name: "My App Name",
  scope: "read_write",
  user_id: 123,
  return_url: "http://app.com/return-page",
  callback_url: "https://app.com/callback-endpoint"
}
query_string = URI.encode_www_form(params)

puts "#{store_url}#{endpoint}?#{query_string}"
Example of JSON posted with the API Keys
{
    "key_id": 1,
    "user_id": 123,
    "consumer_key": "ck_xxxxxxxxxxxxxxxx",
    "consumer_secret": "cs_xxxxxxxxxxxxxxxx",
    "key_permissions": "read_write"
}
Example of the screen that the user will see:
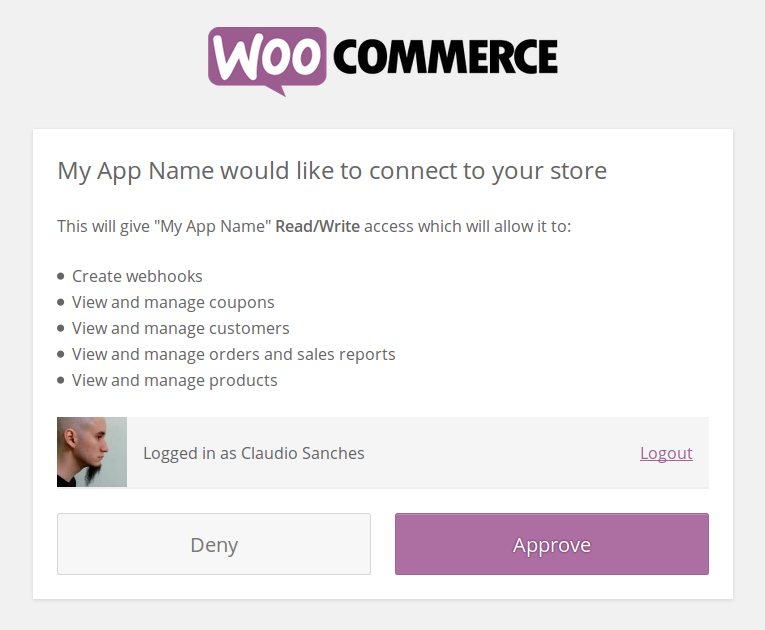
Notes
- While redirecting the user using
return_url, you are also sentsuccessanduser_idparameters as query strings. successsends0if the user denied, or1if authenticated successfully.- Use
user_idto identify the user when redirected back to the (return_url) and also remember to save the API Keys when yourcallback_urlis posted to after auth. - The auth endpoint will send the API Keys in JSON format to the
callback_url, so it's important to remember that some languages such as PHP will not display it inside the$_POSTglobal variable, in PHP you can access it using$HTTP_RAW_POST_DATA(for old PHP versions) orfile_get_contents('php://input');.
Authentication over HTTPS
You may use HTTP Basic Auth by providing the REST API Consumer Key as the username and the REST API Consumer Secret as the password.
HTTP Basic Auth example
curl https://www.example.com/wp-json/wc/v3/orders \
    -u consumer_key:consumer_secret
var WooCommerceAPI = require('woocommerce-api');

var WooCommerce = new WooCommerceAPI({
  url: 'https://example.com',
  consumerKey: 'consumer_key',
  consumerSecret: 'consumer_secret',
  wpAPI: true,
  version: 'wc/v3'
});
<?php
require __DIR__ . '/vendor/autoload.php';

use Automattic\WooCommerce\Client;

$woocommerce = new Client(
    'https://example.com',
    'consumer_key',
    'consumer_secret',
    [
        'wp_api' => true,
        'version' => 'wc/v3'
    ]
);
?>
from woocommerce import API

wcapi = API(
    url="https://example.com",
    consumer_key="consumer_key",
    consumer_secret="consumer_secret",
    wp_api=True,
    version="wc/v3"
)
require "woocommerce_api"

woocommerce = WooCommerce::API.new(
  "https://example.com",
  "consumer_key",
  "consumer_secret",
  {
    wp_json: true,
    version: "wc/v3"
  }
)
Occasionally some servers may not parse the Authorization header correctly (if you see a "Consumer key is missing" error when authenticating over SSL, you have a server issue). In this case, you may provide the consumer key/secret as query string parameters instead.
Example for servers that not properly parse the Authorization header:
curl https://www.example.com/wp-json/wc/v3/orders?consumer_key=123&consumer_secret=abc
var WooCommerceAPI = require('woocommerce-api');

var WooCommerce = new WooCommerceAPI({
  url: 'https://example.com',
  consumerKey: 'consumer_key',
  consumerSecret: 'consumer_secret',
  wpAPI: true,
  version: 'wc/v3',
  queryStringAuth: true // Force Basic Authentication as query string true and using under HTTPS
});
<?php
require __DIR__ . '/vendor/autoload.php';

use Automattic\WooCommerce\Client;

$woocommerce = new Client(
    'https://example.com',
    'consumer_key',
    'consumer_secret',
    [
        'wp_api' => true,
        'version' => 'wc/v3',
        'query_string_auth' => true // Force Basic Authentication as query string true and using under HTTPS
    ]
);
?>
from woocommerce import API

wcapi = API(
    url="https://example.com",
    consumer_key="consumer_key",
    consumer_secret="consumer_secret",
    wp_api=True,
    version="wc/v3",
    query_string_auth=True // Force Basic Authentication as query string true and using under HTTPS
)
require "woocommerce_api"

woocommerce = WooCommerce::API.new(
  "https://example.com",
  "consumer_key",
  "consumer_secret",
  {
    wp_json: true,
    version: "wc/v3",
    query_string_auth: true // Force Basic Authentication as query string true and using under HTTPS
  }
)
Authentication over HTTP
You must use OAuth 1.0a "one-legged" authentication to ensure REST API credentials cannot be intercepted by an attacker. Typically you will use any standard OAuth 1.0a library in the language of your choice to handle the authentication, or generate the necessary parameters by following the following instructions.
Creating a signature
Collect the request method and URL
First you need to determine the HTTP method you will be using for the request, and the URL of the request.
The HTTP method will be GET in our case.
The Request URL will be the endpoint you are posting to, e.g. http://www.example.com/wp-json/wc/v3/orders.
Collect parameters
Collect and normalize your parameters. This includes all oauth_* parameters except for the oauth_signature itself.
These values need to be encoded into a single string which will be used later on. The process to build the string is very specific:
- Percent encode every key and value that will be signed.
- Sort the list of parameters alphabetically by encoded key.
- For each key/value pair:
- Append the encoded key to the output string.
- Append the
=character to the output string. - Append the encoded value to the output string.
- If there are more key/value pairs remaining, append a
&character to the output string.
When percent encoding in PHP for example, you would use rawurlencode().
When sorting parameters in PHP for example, you would use uksort( $params, 'strcmp' ).
Parameters example:
oauth_consumer_key=abc123&oauth_signature_method=HMAC-SHA1
Create the signature base string
The above values collected so far must be joined to make a single string, from which the signature will be generated. This is called the signature base string in the OAuth specification.
To encode the HTTP method, request URL, and parameter string into a single string:
- Set the output string equal to the uppercase HTTP Method.
- Append the
&character to the output string. - Percent encode the URL and append it to the output string.
- Append the
&character to the output string. - Percent encode the parameter string and append it to the output string.
Example signature base string:
GET&http%3A%2F%2Fwww.example.com%2Fwp-json%2Fwc%2Fv3%2Forders&oauth_consumer_key%3Dabc123%26oauth_signature_method%3DHMAC-SHA1
Generate the signature
Generate the signature using the signature base string and your consumer secret key with a & character with the HMAC-SHA1 hashing algorithm.
In PHP you can use the hash_hmac function.
HMAC-SHA1 or HMAC-SHA256 are the only accepted hash algorithms.
If you are having trouble generating a correct signature, you'll want to review the string you are signing for encoding errors. The authentication source can also be helpful in understanding how to properly generate the signature.
OAuth tips
- The OAuth parameters may be added as query string parameters or included in the Authorization header.
- Note there is no reliable cross-platform way to get the raw request headers in WordPress, so query string should be more reliable in some cases.
- The required parameters are:
oauth_consumer_key,oauth_timestamp,oauth_nonce,oauth_signature, andoauth_signature_method.oauth_versionis not required and should be omitted. - The OAuth nonce can be any randomly generated 32 character (recommended) string that is unique to the consumer key. Read more suggestions on generating nonces on the Twitter REST API forums.
- The OAuth timestamp should be the unix timestamp at the time of the request. The REST API will deny any requests that include a timestamp outside of a 15 minute window to prevent replay attacks.
- You must use the store URL provided by the index when forming the base string used for the signature, as this is what the server will use. (e.g. if the store URL includes a
wwwsub-domain, you should use it for requests) - You may test your generated signature using LinkedIn's OAuth test console -- leave the member token/secret blank.
- Twitter has great instructions on generating signatures with OAuth 1.0a, but remember tokens are not used with this implementation.
- Note that the request body is not signed as per the OAuth spec, see Google's OAuth 1.0 extension for details on why.
- If including parameters in your request, it saves a lot of trouble if you can order your items alphabetically.
- Authorization header is supported starting WooCommerce 3.0.
Wishlists
The Wishlists API allows you to view and update individual, or a batch, of wishlists.
Wishlist Properties
| Attribute | Type | Description |
|---|---|---|
id |
integer | Unique identifier for the resource. read-only |
user_id |
integer | WordPress user ID of wishlist owner. |
date_added |
date-time | Date of wishlist creation. Must be the format YYYY-mm-dd H:i:s. read-only |
title |
string | Wishlist title. |
share_key |
string | Wishlist unique key. read-only |
status |
string | Wishlist status. Available values are: 'public', 'share', 'private'. premium only |
Create a Wishlist
premium only This API lets you create a wishlist for a user.
HTTP Request
/wp-json/wc/v3/wishlist/create
Example of creating wishlist:
curl -X POST https://example.com/wp-json/wc/v3/wishlist/create \
    -u consumer_key:consumer_secret \
    -H "Content-Type: application/json" \
    -d '{
      "title": "The new title!",
      "user_id": 3,
      "status": "shared"
    }'
<?php
$data = [
    'title' => 'The new title!',
    'user_id' => 3,
    'staus' => 'shared',
];

print_r($woocommerce->post('wishlist/create', $data));
?>
JSON response example:
{
   "id":25,
    "user_id":2,
    "date_added":"2019-08-10 11:34:02",
    "title":"new title",
    "share_key":"5A1672",
    "status": "shared"
}
Retrieve a Wishlist by Share Key
This API lets you retrieve and view a specific Wishlist data by unique share key.
HTTP request
/wp-json/wc/v3/wishlist/get_by_share_key/SHARE_KEY
Example of retrieving wishlist data:
curl https://example.com/wp-json/wc/v3/wishlist/get_by_share_key/D61946 \
  -u consumer_key:consumer_secret \
<?php
print_r($woocommerce->get('wishlist/get_by_share_key/D61946'));
?>
JSON response example:
{
  "id": 3,
  "user_id": 1,
  "date_added": "2019-07-15 09:49:32",
  "title": "Default wishlist",
  "share_key": "D61946"
}
Retrieve a Wishlist by user
This API lets you retrieve and view a specific Wishlist data by WordPress user ID.
HTTP request
/wp-json/wc/v3/wishlist/get_by_user/id
Example of retrieving wishlist data:
curl https://example.com/wp-json/wc/v3/wishlist/get_by_user/1 \
  -u consumer_key:consumer_secret \
<?php
print_r($woocommerce->get('wishlist/get_by_user/1'));
?>
JSON response example:
[{
    "id":1,
    "user_id":1,
    "date_added":"2019-04-09 20:35:02",
    "title":"Default wishlist!",
    "share_key":"2D2B21"
}]
Update a Wishlist
This API lets you make changes to a wishlist.
HTTP Request
/wp-json/wc/v3/wishlist/update/share_key
Example of updating wishlist data:
curl -X POST https://example.com/wp-json/wc/v3/wishlist/update/5C6EE9 \
    -u consumer_key:consumer_secret \
    -H "Content-Type: application/json" \
    -d '{
      "title": "The new title!",
      "user_id": 3
    }'
<?php
$data = [
    'title' => 'The new title!',
    'user_id' => 3,
];

print_r($woocommerce->post('wishlist/update/5C6EE9', $data));
?>
JSON response example:
{
    "id":10,
    "user_id":3,
    "date_added":"2019-04-23 07:40:38",
    "title":"The new title!",
    "share_key":"5C6EE9"
}
Delete a Wishlist
premium only This API lets you delete a wishlist by share key.
HTTP request
/wp-json/wc/v3/wishlist/delete/sharekey
Example of deleting a wishlist:
curl https://example.com/wp-json/wc/v3/wishlist/delete/5C6EE9\
    -u consumer_key:consumer_secret
<?php print_r($woocommerce->get('wishlist/delete/5C6EE9')); ?>
JSON response example:
"Wishlist deleted."
Wishlist Products
The wishlist products API endpoints allows you to view, add and remove products from a wishlist.
Wishlist Product Properties
| Attribute | Type | Description |
|---|---|---|
item_id |
integer | Unique identifier for the resource. read-only |
product_id |
integer | WooCommerce product ID. |
variation_id |
integer | WooCommerce product variation ID. |
quantity |
integer | Quantity premium only. |
meta |
array | The product extra fields data array in the format key => value. |
date_added |
date-time | The date the product was added to a wishlist, in the site's timezone. read-only |
price |
string | The product price. read-only |
in_stock |
boolean | Define if the product is purchasable. write-only |
Retrieve Wishlist Products
This API lets you retrieve and view products from a specific wishlist.
HTTP request
/wp-json/wc/v3/wishlist/share_key/get_products
Example of retrieving wishlist products data:
curl https://example.com/wp-json/wc/v2/wishlist/5C6EE9/get_products \
    -u consumer_key:consumer_secret
<?php print_r($woocommerce->get('wishlist/5C6EE9/get_products')); ?>
JSON response example:
[
  {
    "item_id":254,
    "product_id":28,
    "variation_id":0,
    "meta":[],
    "date_added":"2019-06-20 17:42:46",
    "price":"55",
    "in_stock":true
  },
  {
    "item_id":255,
    "product_id":28,
    "variation_id":0,
    "meta":[],
    "date_added":"2019-06-20 17:42:46",
    "price":"55",
    "in_stock":true
  }
]
Available parameters
| Parameter | Type | Description |
|---|---|---|
count |
integer | Maximum number of items to be returned in result set. Default is 10. |
offset |
integer | Current offset of the collection. Default is 0. |
order |
string | Order sort attribute ascending or descending. Options: ASC and DESC. Default is DESC. |
Add Wishlist Product
This API lets you add a product to a specific wishlist.
HTTP request
/wp-json/wc/v3/wishlist/share_key/add_product
Example of adding a product to the wishlist:
curl  -X POST  https://example.com/wp-json/wc/v3/wishlist/5C6EE9/add_product \
    -u consumer_key:consumer_secret \
    -H "Content-Type: application/json" \
    -d '{
         "product_id": 237,
          "variation_id": 238,
          "meta": {
            "test": "text"
          }
       }'
<?php
$data = [
     "product_id" => 237,
      "variation_id" => 238,
      "meta": array (
        "test"=> "text",
      ),
];

print_r($woocommerce->post('wishlist/5C6EE9/add_product', $data));
?>
JSON response example:
[
  {
    "item_id":267,
    "product_id":237,
    "variation_id":238,
    "meta":{
            "test":"text"
          },
    "date_added":"2019-07-15 15:29:25",
    "price":"1",
    "in_stock":true
  }
]
Remove Wishlist Product
This API lets you remove the product from a wishlist by unique identifier (item ID).
HTTP request
/wp-json/wc/v3/wishlist/remove_product/item_id
Example of remove the product from a wishlist:
curl https://example.com/wp-json/wc/v3/wishlist/remove_product/267 \
    -u consumer_key:consumer_secret
<?php print_r($woocommerce->get('wishlist/remove_product/267')); ?>
JSON response example:
"Product removed from a wishlist."